Affiliate disclosure: This page contains affiliate links. If you buy something through one of them, we may earn a commission at no extra cost to you. We only list gear we would put on our own truck, and a commission never changes how we rate it.
Who this is for
Stock headlights only do so much. The moment you get off pavement and the sun goes down, everything disappears a few car lengths out. An LED light bar or a pair of pod lights fixes that. The catch is that "brighter" on a listing tells you nothing about what you'll actually get out here, which is why most people buy one, run it once in the dark, and wish they'd looked at the beam pattern first.
These are the four I'd actually put on the truck, all current prices on Amazon, all with the harness in the box. The short version is in the table below, then each one gets a fuller write-up with the details that matter at 11 pm in a washboard slot.
| Pick | Type | Lights | Price |
|---|---|---|---|
| Budget start: Nilight 4 in pods | 2 pod lights, no bar | 20x 3W, 60W, 2700 LM | $26.99 |
| Best value bar: Nilight 12 in | 12 in bar + 2 pods | 72W bar, spot/flood | $38.69 |
| Most light per inch: NAOEVO 12 in | 12 in bar + 4 pods | 540W / 54,000 LM (claimed) | $45.99 |
| Full-size truck bar: Nilight 20 in | 20 in bar + 2 pods | 126W, 16AWG 3-lead | $49.17 |
How to read a light bar spec without lying to yourself
Two numbers get printed on every listing, and neither one is the full story. Watts is how hard the thing draws; lumens are how much light it throws. A bar can list a huge lumen number and still light up only the hood, because the beam is a tight spot that goes long but narrow. A flood beam spreads wide and short, so it lights the trail edges and drop-offs but won't throw down the highway.
Spot/flood combo patterns alternate that in a single bar, and they're the sweet spot for mixed driving. The other thing to check before you buy is waterproof rating. IP67 means you can spray water on it and it survives; IP68 means it can sit submerged and live. For overland dust and washboard rattle, IP67 is the floor I'd accept.
Nilight 4 inch pod pair. The budget start
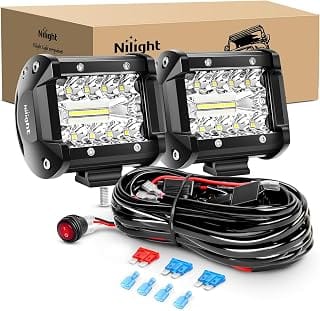
These are not a bar. They're two 4 inch pod lights that screw into your bumper or light bar mount, and at $26.99 they solve the same problem for a third of the money. Each pod runs 20 small 3W LEDs, 60W across both, which the spec sheet puts at about 2,700 lumens combined. The housing is 6063 aluminum and the rating is IP67, with a triple-row spot/flood pattern that spreads wide enough to see the trail and throw just far enough to not blind the driver in front of you on a night road.
The kit includes a 12 foot wiring harness with a 2-lead setup, so it drops behind a bumper with a little tape and a fuse. My use for a set like this is as an affordable first upgrade or as a rear-facing pair under a tool box, because at this price you can run two pairs and not cry. The bracket is adjustable, which matters more than people expect once you've mounted it and you want to nudge the beam down three degrees. If you just need more light somewhere specific and you don't want to wire a full bar through the cab, start here.
Nilight 12 inch 72W. The best value bar
At $38.69 this is the one I'd point a first-timer to. It's a proper 12 inch bar in a spot/flood combo pattern at 72W, and the listing bundles it with two 4 inch flood pods running 18W each. So you get a bar up top for the throw down the trail and a low pair for the edges, for under $40. The harness is a 3-lead kit, which gives you a cleaner wiring option than the 2-lead pods above if you're splitting a relay between high and low.
Twelve inches fits a midsize truck or an SUV light bar mount without swallowing the whole grille, which is why it's the most common size in the scene. The real-world quirks: the bars in this class get warm, so mount it where the aluminum profile can breathe and don't tape it against another light. And check your fuse before you flip it, because a full bar plus pods will draw enough that a 7.5A stock fuse can dance. A dedicated 20A fuse on a fused relay is the correct way to run it, and the 3-lead harness makes that a straight job.
NAOEVO 12 inch with 4 pods. The most light for the size
This is the one with the big sticker numbers. The listing calls the 12 inch bar 540W at 54,000 lumens in a spot/flood combo, aluminum housing, and it throws in four 4 inch pod lights instead of two. That's a lot of glass for a 12 inch footprint, and on paper it will out-shoot the other 12 inch here. The warranty is one year, which is a step below what Nilight runs, so that's the trade for the extra pods.
Here's the honest take, because this is where I'd pause before buying. Those lumen numbers for this whole category are marketing numbers, not measured output. The "54,000 lumens" claim on a 12 inch bar is the kind of figure a spec sheet prints so the listing wins a search. What NAOEVO actually gives you that the others don't is the four low pods, which is genuinely useful because low light is what keeps you from catching a rock in the rim after the bar has lit the middle. If you want the widest low-angle coverage at a 12 inch size, this is it. If you care about the highest rated wattage on the label, this wins too. Just don't believe the absolute lumen figure; judge it on the pattern, which here is strong.
Nilight 20 inch 126W. The full-size truck bar
When you have a full-size pickup and you want a bar that spans the width of the grille, this is the size. Twenty inches, 126W, spot/flood combo, with two 4 inch 18W pods and a 3-lead 16AWG harness. The thicker wire in the box is a good sign, because a bar this long drawing this much wants something heavier than the 18AWG you get on the smaller kits, and 16AWG will hold voltage over a long run to the front without the lights dimming when the battery is tired.
It carries a 2 year warranty, the longest in this list, which is what you want on the biggest, heaviest light you're bolting to a truck that's going to rattle for thousands of miles. A 20 inch bar is also a commitment on the mount side. You need a bar mount rated for the weight, and you want the mounts on each end, not a single central bracket, or the ends will walk over time. The beam from a full 20 inch throw is noticeably longer than a 12 inch, and that's most of why you'd pay the extra over the 12 inch, so if your truck is a midsize it may look oversized on the front. Measure your grille and the mount length first.
Wiring and the one rule that keeps it legal
No matter which one you buy, the wiring is where cheap bars stop being a good deal. Run a fused relay, not a tap off an existing fuse, and put the fuse close to the battery. Every kit in this list includes a harness and a switch, but none of them include a relay, and that's a $8 part you should add. The reason is two fold: it keeps the switch from handling the full current and melting, and it keeps voltage from sagging along the wire run.
The other rule is the beam angle. In a lot of places a bar aimed at oncoming headlights gets you a ticket, and an aimed-too-high bar does that even at moderate speed. Mount the bar so the beam pattern sits low, adjust the pods so they light the trail and not the windshield in front of you, and if you're ever driving on public highway at night you've got to know how to aim them back or cover the top row. That last part is the whole reason the spot/flood pattern beats a pure spot for a truck you actually drive on pavement sometimes.
Where I'd put each one
The 4 inch pods are for a light budget or a second location, like the rear for a work light. The 12 inch 72W is the safe default for your first bar on a midsize rig, and it costs the least of the real bars. The NAOEVO is for someone who wants the widest low coverage out of a 12 inch and doesn't mind the shorter warranty. The 20 inch is for a full-size truck that sees a lot of dark, remote road and you're willing to buy the right mount for it. Any of the four will get you out of the dark; picking the size that fits your mount and the pattern that fits how you drive is what separates a good upgrade from a glowing headache.
More gear for the back of the truck
Once the lights are on, the rest of the rig has to keep up. If you're still building out the electrical side, the power inverters guide covers running 110V gear without killing the battery, and the off-road recovery kit guide is the stuff you hope to never need but pull fast when the dark and the soft ground show up at once. For cameras that handle the same dust and rattle the lights do, see the dash cam guide for overlanding rigs.
Deals on the exact bars in this guide, and on the rest of the overland kit, are tracked at the RigTested deals page, where prices and stock are checked as listings change.
Get the gear that holds up
New guides, hands-on reviews as they land, and real deals, about once a week. No spam, unsubscribe anytime.